HUGOアップデート2024
毎年恒例?HUGOアップデート2024
私が使っているテーマWowchemy(旧Academic)がさらに名前が変わってHugo Blox
になっているという大規模変更あり…orz
こんなん、差分探して直していくなんて無理。。。
なので例年のアプローチとは違うアプローチ。
「新しいサイトを作って、コンテンツを移行する」作戦です。
とにかくメンテナンス性を重視してシンプルな構成を目指します。
ちなみに現状
Hugo 0.109.0
MacOS Sonoma 14.2.1
まずHUGO自体は最新版にアップデート
■Homebrewの更新
- 現在バージョン確認
brew --version
結果>
Homebrew 3.6.16
Homebrew/homebrew-core (git revision 3d88cb728c5; last commit 2023-01-01)
- 更新
brew update
数分何も動きはありませんが、その後どっと動いて終了
- 再度現在バージョン確認
brew --version
結果>うまくいったみたい
Homebrew 4.2.1
Homebrew/homebrew-core (git revision 1cd5afaed20; last commit 2024-01-01)
■HUGOの更新
- 現在バージョン確認
hugo version
結果>
hugo v0.109.0+extended darwin/arm64 BuildDate=unknown
- 更新
brew upgrade hugo
どっと動いて終了
- 再度現在バージョン確認
hugo version
結果>うまくいったみたい
hugo v0.121.1-00b46fed8e47f7bb0a85d7cfc2d9f1356379b740+extended darwin/arm64 BuildDate=2023-12-08T08:47:45Z VendorInfo=brew
■新サイト作成
さてここからは新サイト作っていきます。
素直にHugo公式サイトのQuick start
のままいきます。
- Create a site
hugo new site quickstart
結果>できた
Congratulations! Your new Hugo site was created in /Users/xxx/quickstart.

Just a few more steps...

1. Change the current directory to /Users/xxx/quickstart.
2. Create or install a theme:
   - Create a new theme with the command "hugo new theme <THEMENAME>"
   - Install a theme from https://themes.gohugo.io/
3. Edit hugo.toml, setting the "theme" property to the theme name.
4. Create new content with the command "hugo new content <SECTIONNAME>/<FILENAME>.<FORMAT>".
5. Start the embedded web server with the command "hugo server --buildDrafts".

See documentation at https://gohugo.io/.
続いてthemaを入れていきます。
cd quickstart
git init
結果>
hint: Using 'master' as the name for the initial branch. This default branch name
hint: is subject to change. To configure the initial branch name to use in all
hint: of your new repositories, which will suppress this warning, call:
hint:
hint: 	git config --global init.defaultBranch <name>
hint:
hint: Names commonly chosen instead of 'master' are 'main', 'trunk' and
hint: 'development'. The just-created branch can be renamed via this command:
hint:
hint: 	git branch -m <name>
Initialized empty Git repository in /Users/xxx/quickstart/.git/
QuickStartのままanankeを利用。
git submodule add https://github.com/theNewDynamic/gohugo-theme-ananke.git themes/ananke
結果>
Cloning into '/Users/xxx/quickstart/themes/ananke'...
remote: Enumerating objects: 2694, done.
remote: Counting objects: 100% (123/123), done.
remote: Compressing objects: 100% (70/70), done.
remote: Total 2694 (delta 61), reused 96 (delta 46), pack-reused 2571
Receiving objects: 100% (2694/2694), 4.52 MiB | 8.13 MiB/s, done.
Resolving deltas: 100% (1493/1493), done.
続いてプレビュー起動
echo "theme = 'ananke'" >> hugo.toml
hugo server
結果>
Watching for changes in /Users/yamaokaakio/quickstart/{archetypes,assets,content,data,i18n,layouts,static,themes}
Watching for config changes in /Users/yamaokaakio/quickstart/hugo.toml, /Users/yamaokaakio/quickstart/themes/ananke/config.yaml
Start building sites …
hugo v0.121.1-00b46fed8e47f7bb0a85d7cfc2d9f1356379b740+extended darwin/arm64 BuildDate=2023-12-08T08:47:45Z VendorInfo=brew


                   | EN
-------------------+-----
  Pages            |  7
  Paginator pages  |  0
  Non-page files   |  0
  Static files     |  1
  Processed images |  0
  Aliases          |  0
  Sitemaps         |  1
  Cleaned          |  0

Built in 31 ms
Environment: "development"
Serving pages from memory
Running in Fast Render Mode. For full rebuilds on change: hugo server --disableFastRender
Web Server is available at http://localhost:1313/ (bind address 127.0.0.1)
Press Ctrl+C to stop
ここまでで /quickstart というディレクトリにいろいろとできてるので、これをそのまま /brownmorning にコピー
動作確認
cd brownmorning
hugo server
http://localhost:1313/へアクセスして初期ページが表示されることを確認。
これでベースができました。
続けてカスタマイズしていきます。
- Configuration file (hugo.toml)を編集
Hugo公式サイトのConfigure Hugo
hugo.toml の初期状態
baseURL = 'https://example.org/'
languageCode = 'en-us'
title = 'My New Hugo Site'
theme = 'ananke'
これをthemes/ananke/exampleSite/config.toml の内容に置き換えて、
以下のように編集
ちなみに今回から設定ファイルはこの1ファイルのみ
後で見直すときのためにコメントいっぱい入れてます(特に参考サイトURL)
設定値
##### HUGO ORIGINAL #####
# https://gohugo.io

### Configuration ###
# https://gohugo.io/getting-started/configuration/
#####################
title = "茶色の朝を迎えないために"
baseURL = "https://brownmorning.net"
languageCode = "ja"
DefaultContentLanguage = "ja"
theme = ["ananke"]
summaryLength = 5

### Google Analytics ###
[services]
  [services.googleAnalytics]
    ID = 'xxxxx'

### Pagination ###
# https://gohugo.io/templates/pagination/
##################
Paginate = 12

### Menus ###
# Define in site configuration
# https://gohugo.io/content-management/menus/
#############
[menus]
[[menus.main]]
    name = 'まずはここから'
    pageRef = '/article/navigation'
    weight = 10
[[menus.main]]
    name = 'フィールドワーク'
    pageRef = '/article/peace/fieldworksummary'
    weight = 20
[[menus.main]]
    name = 'イベント'
    pageRef = '/article/event/eventtop'
    weight = 30
[[menus.main]]
    name = '街宣'
    pageRef = '/article/gaisen/gaisentop'
    weight = 40
[[menus.main]]
    name = '昔今語り'
    pageRef = '/mukashiima/'
    weight = 50
[[menus.main]]
    name = '全記事'
    pageRef = '/article/'
    weight = 60

### Sitemap templates ###
# https://gohugo.io/templates/sitemap-template/
#########################
[sitemap]
  changefreq = "always"
  priority = 0.5
  filename = "sitemap.xml"

### Configure markup ###
# https://gohugo.io/getting-started/configuration-markup/
########################
[markup]
  [markup.goldmark]
    [markup.goldmark.renderer]
	  # By default, Goldmark does not render raw HTML and potentially dangerous links. If you have lots of inline HTML and/or JavaScript, you may need to turn this on.
      unsafe = true

### Hugo Deploy ###
# https://gohugo.io/hosting-and-deployment/hugo-deploy/
########################
[deployment]
[[deployment.targets]]
# An arbitrary name for this target.
name = "production"
# Amazon Web Services S3; see https://gocloud.dev/howto/blob/#s3
# For S3-compatible endpoints, see https://gocloud.dev/howto/blob/#s3-compatible
URL = "xxxxx"
# If you are using a CloudFront CDN, deploy will invalidate the cache as needed.
cloudFrontDistributionID = "xxxxx"

##### Ananke #####
# https://themes.gohugo.io/themes/gohugo-theme-ananke/
[params]
  text_color = ""
  author = ""
  favicon = ""
  site_logo = ""
  description = ""
  # choose a background color from any on this page: https://tachyons.io/docs/themes/skins/ and preface it with "bg-"
  background_color_class = "bg-dark-blue"
  recent_posts_number = 20
  # time.Format https://gohugo.io/functions/time/format/
  date_format = "2006-01-02"
  # assets/ananke/css/custom.css
  custom_css = ["custom.css"]

[[params.ananke_socials]]
  name = "twitter"
  url = "https://twitter.com/brownmorning"
[[params.ananke_socials]]
  name = "facebook"
  url = "https://www.facebook.com/AkioYamaoka0913"
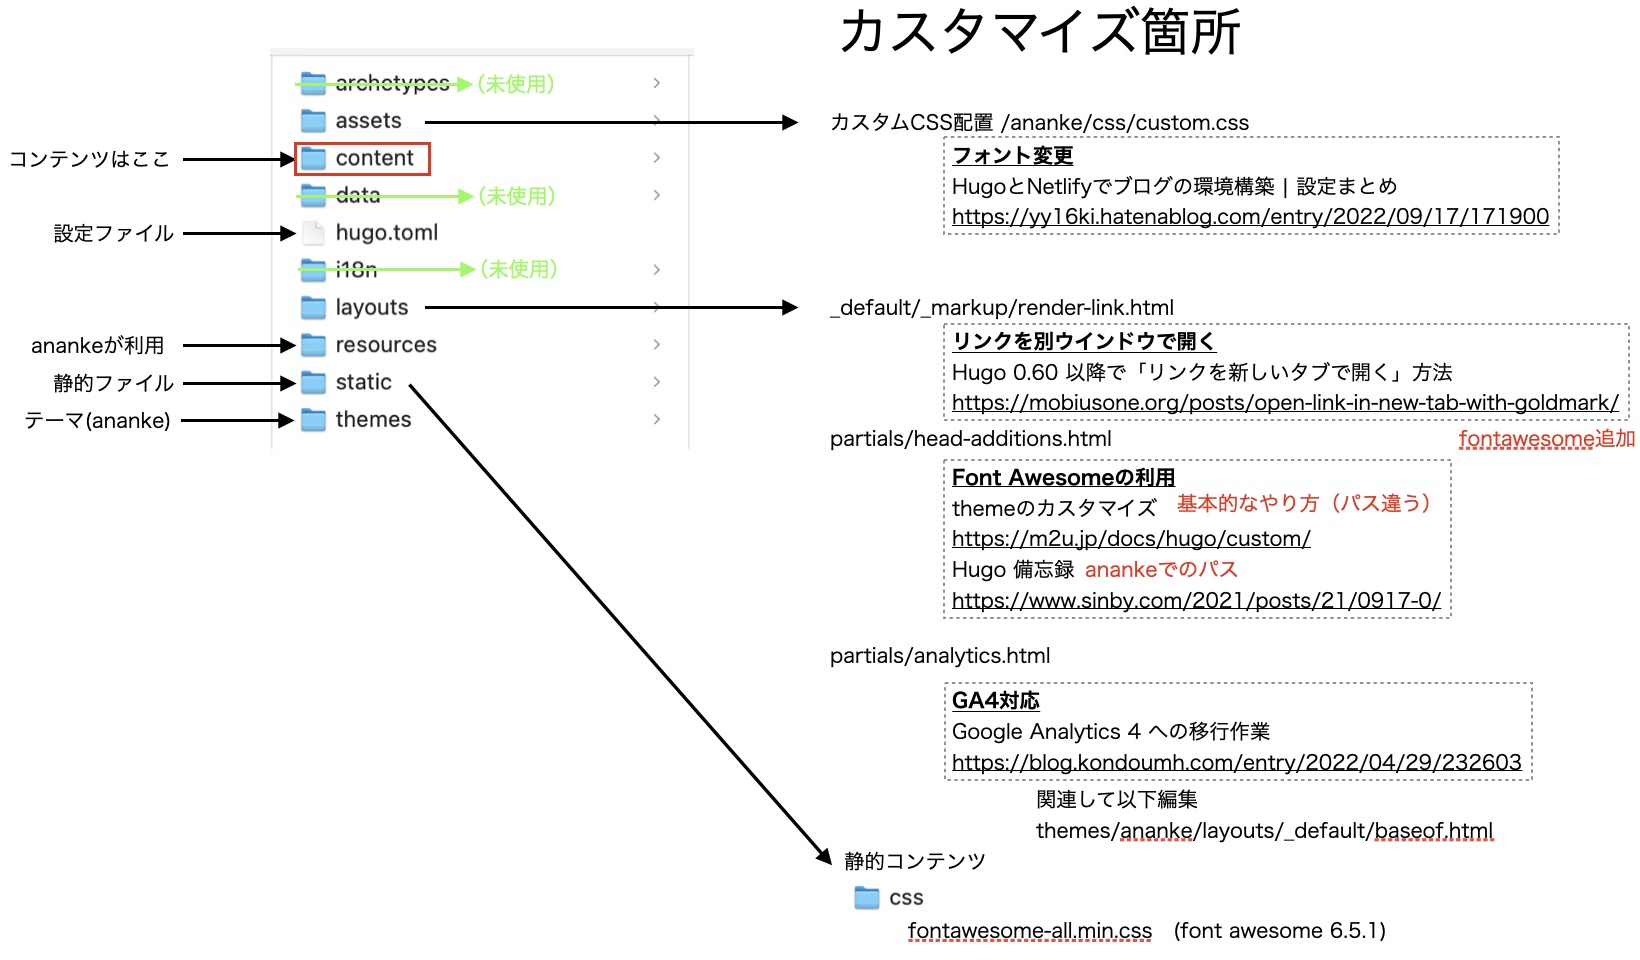
以下の3点だけカスタマイズしました。
①フォントを変更
・assets/ananke/css/custom.css として追加
・hugo.tomlの「[params]custom_css」設定
(参考URL)
HugoとNetlifyでブログの環境構築 | 設定まとめ
②リンクを別ウィンドウで開く
・layouts/_default/_markup/render-link.html 追加
<a href="{{ .Destination | safeURL }}"{{ with .Title}} title="{{ . }}"{{ end }}{{ if strings.HasPrefix .Destination "http" }} target="_blank"{{ end }}>{{ .Text }} <i class="fa fa-external-link"></i></a>
(参考URL)
Hugo 0.60 以降で「リンクを新しいタブで開く」方法
③fontawsomeのアイコン利用
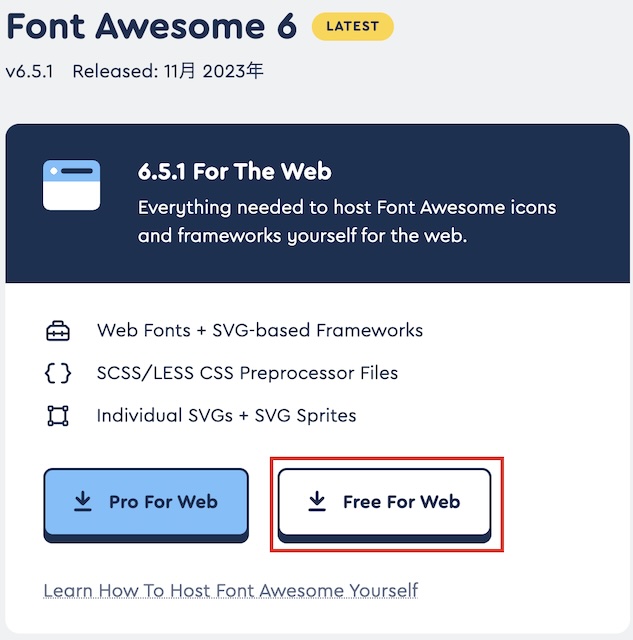
・fontawesomeのダウンロード
からFree For Webをダウンロード

・all.min.cssをfontawesome-all.min.cssとリネームし、static/css/ 下にコピー
・layouts/partials/head-additions.html 追加
<link rel="stylesheet" href="{{ "/css/fontawesome-all.min.css" | absURL }}">
(参考URL)
themeのカスタマイズ
Hugo 備忘録
ちなみにこの設定だとsafariで正常なfontawesomeのアイコンが表示されないみたいなんですが、とりあえず放置。
(2024/1/14追記)
static/ にfont awesomeからダウンロードしたsvgs, webfontsフォルダをそのまんまコピーすると表示されるようになりました!
■Google Analytics
GA4にも対応しようと。。。
プロパティは勝手にGA4プロパティができて接続されてたみたい。
なのであとはトラッキングコードの埋め込み
無茶苦茶時間かかりましたが、参考URLのおかげでなんとか設定終了(感謝)。
・hugo.tomlのパラメータでトラッキングコード設定
・layouts/partials/analytics.html 追加
{{ if not .Site.IsServer }}
{{ with .Site.GoogleAnalytics }}
<!-- Global site tag (gtag.js) - Google Analytics 4-->
<script async src="https://www.googletagmanager.com/gtag/js?id={{ . }}"></script>
<script>
  window.dataLayer = window.dataLayer || [];
  function gtag(){dataLayer.push(arguments);}
  gtag('js', new Date());

  gtag('config', '{{ . }}');
</script>
{{ end }}
{{ end }}
・themes/ananke/layouts/_default/baseof.html 編集
{{ template "_internal/google_analytics_async.html" . }}
この部分を以下のように書き換え
{{- partial "analytics" . -}}
そしてこっからが重要なんですが。。。
デプロイ時に環境変数設定が必要でした。
baseof.html内での条件分岐で使われている環境変数HUGO_ENVを明示的に指定しないとダメっぽい。
それがわかるまでに相当時間かかりました。やれやれ。
詳細は後述(デプロイ方法)
(参考URL)
Google Analytics 4 への移行作業
今回、デフォルトからの設定変更はこれだけ。
まとめた図を以下にのせますが、
前のテーマ「Wowchemy」との大きな差は、画像拡大機能がなくなったこと・・・
ブラウザの拡大機能か、画像だけ表示でご覧ください。

あとはコンテンツをこちらに移行します。
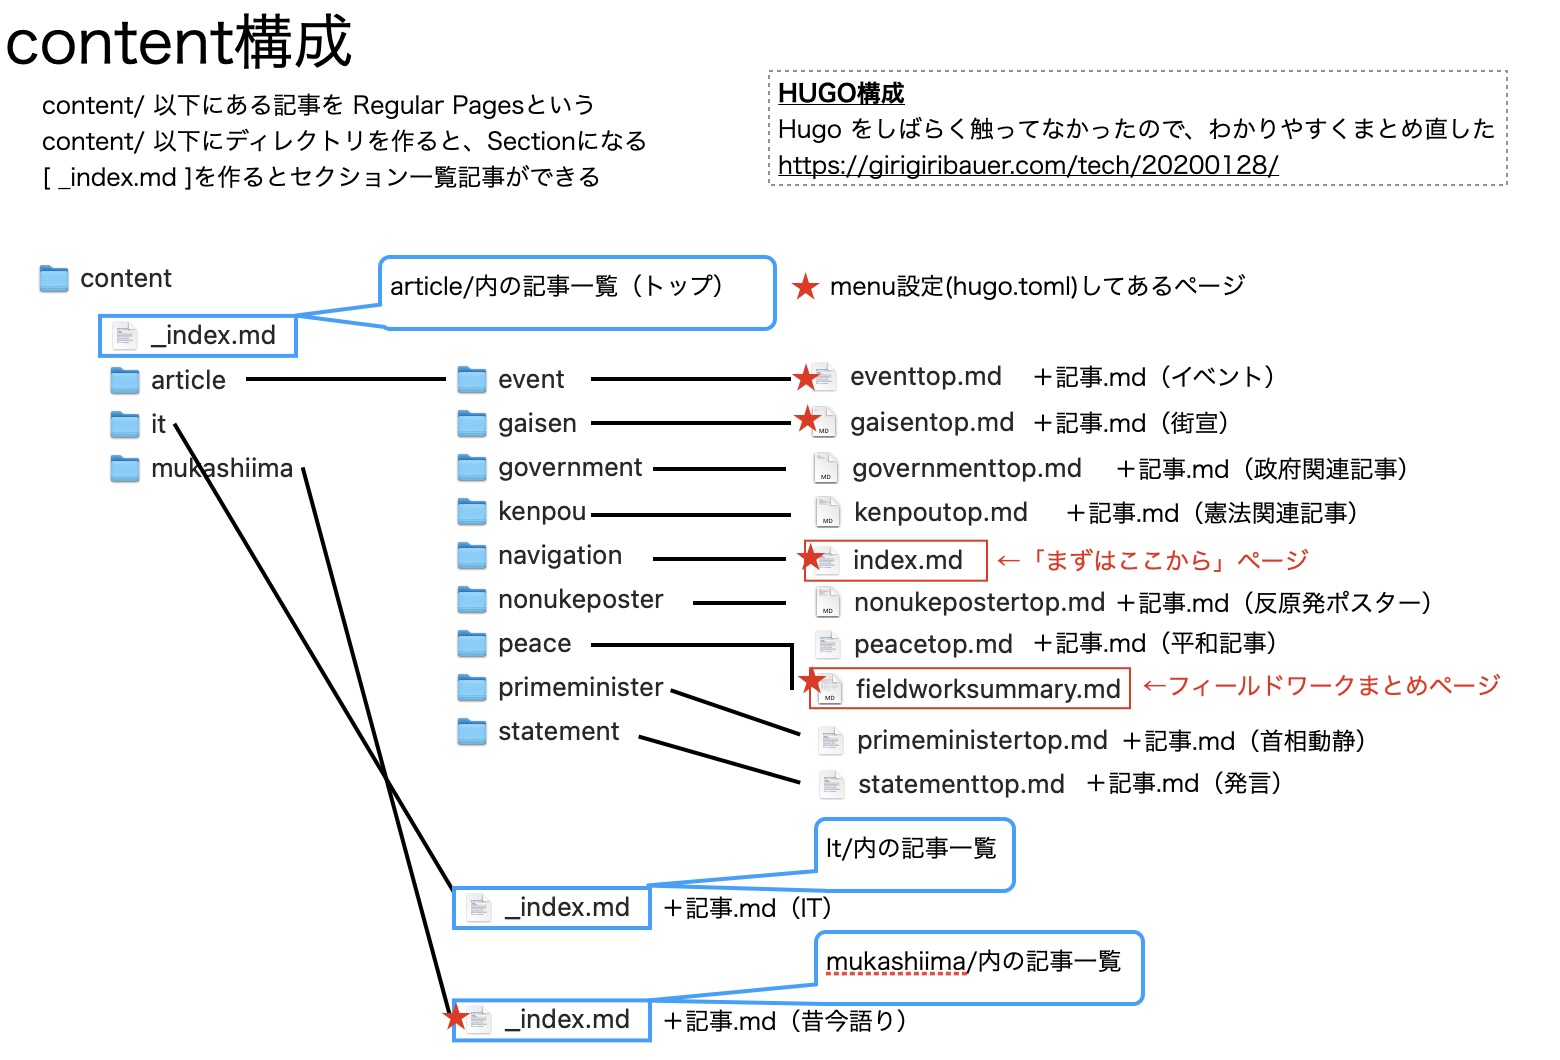
細かい説明は省略しますが、全コンテンツをcontent/ (一部の静的ファイルは static/)に置きました。

以下、完全に自分用の覚書
「_index.mdがあるフォルダ内のコンテンツはその上階層の_index.md内で一覧されない」ようなので
・メインの記事はarticle内に配置
・タグでサブカテゴリを必ず指定
・サブカテゴリはフォルダで分けて、各フォルダ内に「フォルダ名+top.md」でサブカテゴリのトップページ作成
(一覧リンクはサブカテゴリ名のタグ一覧利用)
・「IT覚書」、「昔今語り」は別扱い
前に比べてとてもシンプルになったと思います。
■デプロイ方法
ほとんど今までと変わってませんが、デプロイ時に環境変数設定を追加
・hugo.tomlのパラメータ設定
・デプロイ用のシェルスクリプト作成(ポイントはHUGO_ENVの設定)
#!/bin/bash
echo start
cd (ディレクトリ)
export HUGO_ENV="production"
hugo --buildFuture --environment production
hugo deploy
echo end
ちなみにプレビュー用には
#!/bin/bash
echo start
cd (ディレクトリ)
hugo server -F
echo end
(参考URL)
Hugoで静的サイトをジェネる
参考URLに記載のサイト作成者の皆様、ありがとうございました。
20240103 新規作成
20240114 font awesome 追加設定